 |
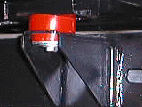
Poly Body Mounts :: Installation..... 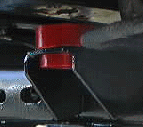 I went and got new washers and bolts to use on the mounts. I couldn't find any stainless
bolts or washers in the size I needed so I had to use galvanized instead.
But if I do run across stainless bolts and washers in that size, I will replace them. Installation
is fairly simple at this point. Just insert the top of mount between the frame and body into
the mount holes. Then slide the bottom part of the mount onto the protruding part and you're done.
There are 13 mounts, 6 per side and 1 grill mount.
I went and got new washers and bolts to use on the mounts. I couldn't find any stainless
bolts or washers in the size I needed so I had to use galvanized instead.
But if I do run across stainless bolts and washers in that size, I will replace them. Installation
is fairly simple at this point. Just insert the top of mount between the frame and body into
the mount holes. Then slide the bottom part of the mount onto the protruding part and you're done.
There are 13 mounts, 6 per side and 1 grill mount. 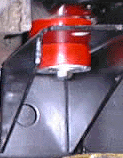 Be sure to note that the 2 mounts at the
very rear on the rear crossmember have larger bolts. The 2 forwardmost mounts (very front of cab)
and the grill mount have longer bolts than the other 8 mounts. The 2 forwardmost mounts use longer bolts because they have thicker bottom mount pads.
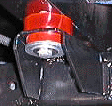
The grill mount can be tricky. I had to loosen up the 6 bolts that hold the fenders to the grill
in order to move the grill enough to swap out the mounts. Once you have driven the vehicle
for a few days, you may want to check the bolts again to make sure they haven't worked loose. Be sure to note that the 2 mounts at the
very rear on the rear crossmember have larger bolts. The 2 forwardmost mounts (very front of cab)
and the grill mount have longer bolts than the other 8 mounts. The 2 forwardmost mounts use longer bolts because they have thicker bottom mount pads.
The grill mount can be tricky. I had to loosen up the 6 bolts that hold the fenders to the grill
in order to move the grill enough to swap out the mounts. Once you have driven the vehicle
for a few days, you may want to check the bolts again to make sure they haven't worked loose.
  By now you may be wondering why I chose the poly body mounts. Well, I almost bought the OEM kit from Four Wheel Drive Hardware, but then I decided that that would not solve the problem. The OEM kit would rust again because of the metal spacers used on the mounts. The poly kit is all poly and the only metal used are the new washers. I think I am going to go back and drill small holes in the washers to allow for drainage. I think that between the poly mounts and vented washers, that will prevent such large amounts of rust forming on the frame. |
| <---- Back to Part 1 |